zaterdag 12 december 2015

Donkey Kong - Is this cabinet finished?

No not yet for this donkey kong cabinet. It still waits for a Nintendo coin door. The search for this item continues.
Thanks for reading this blog. I hope it inspires people to do future builds of this beautiful arcade hobby. My thanks goes out to:
- My wife for her support during this build.
- My father for helping me out with some electrical parts.
- The online stores Mikesarcade.com and Quarterarcade.com for supplies
- The dragonlairfans members for support and inspiration.
- And of course the Donkey itself!


Donkey Kong - Another day another job

It’s time for the electrical part of the donkey kong arcade cabinet now. Things needed to be done: 
- arcade power supply 
- wiring the jamma harness 
- speaker wiring 
- i-pac mount on the control panel 
- soldering 
Let’s start with it.


Everything works OK. There is a jamma circuit active ( tested with a I-cade 60 in 1 PCB) and a Mame circuit. This cab will get a arcade monitor in the future but for now I’m happy with this setup.


Donkey Kong - Cabinet side art

With the measures of scr33n on the dragonslairfans website it was done quite easy. First taping the stickers on both sides. After that , gently remove the back paper and strike it flat. The side art becomes visible.


Not the best pictures but it’s looking quite perfect. A very nice donkey kong arcade cabinet with side art. We call it a day.

Donkey Kong - T-molding time

It’s time for another nice job. T-molding the both side panels of the donkey kong arcade cabinet.


This is done with a rubber mallet to avoid damage of the molding. It worked fine this way. Another job finished. Let’s do one more thing before quit the day.

Donkey Kong - Reassemble the cabinet

Now it’s time for building up. I had a few things ordered from Mikesarcade which are now  waiting to get in the cab.


Donkey Kong - Paint it blue

After the black layer dried it was time for the blue color. On the dragonslairfans website i was pointed to the near matched color. Thanks for that Gyruss and ckong.


We are getting there. I love the smell of a new painted donkey kong arcade cabinet. It’s becoming a nice Nintendo look alike donkey kong cabinet. Still a few things to do. 


Donkey Kong - Paint it black

Rolling Stones? No, that is not what this blog is about! We continue with the paintwork on the donkey kong cabinet. The primer was well dried so the first layer of black paint is on.


Donkey Kong - Paint it white

Finally all the woodwork done and it’s time for the first layer of primer. I bought a normal MDF primer from a local store and was curious for the results?
Mmmmm, definitely needed two or more primer layers. This cab is lurking paint! Ok, so be it. Let’s paint and wait for the black layer.


Donkey Kong - The backside of the cabinet

It’s time for the backside of the donkey kong arcade cabinet. It will be not the same as the original one. This backdoor has no hole in it. I have to see if this works out cause the inside of the cab could be very warm. Trial and error maybe?


Donkey Kong - Monitor bezel mount

It's time for a new part of the build. This one was the hardest I think. The donkey kong monitor bezel has to be in a exact position for mounting on the bottom of the wooden beam. So exact measurement had to be done. Fortunately this worked out well and it fits perfectly.

Donkey Kong - Marquee section

So, we are getting somewhere. It's time for the donkey kong marquee section now. At quarterarcade i found the top and bottom marquee bracket. Time to fit that in the cab.


After measuring and fitting i decided it was ok. Now the good protected donkey kong marquee is placed to see the results. What do you think?

woensdag 9 december 2015

Donkey Kong - LCD monitor

Although i like the original arcade monitor a lot, this build has a normal 19 inch lcd monitor. A piece of plywood was cut and fit into the cab. This has to be the monitor mount for the time being. Maybe some day there will come a original arcade monitor.

maandag 7 december 2015

Donkey Kong - control panel

At my search on the Internet prior to this build i found a nice donkey kong control panel with some parts of the original Nintendo joystick and wire harness. There were also the original button holders mounted. That was a very nice starting point.

Stripping the control panel was the first thing that have to be done. After stripping the panel the surface was sanded. To get a better result i decided to put adhesive vinyl on the control panel. This worked out very well.

The control panel fitting was another job. I returned to the cab and placed two latches for retaining the control panel. Also a metal plate was mounted for retaining the front side of the control panel. All fits well.

Back to the control panel itself. It was time to clean the 30 year old dirt from the button holders, joystick and wires. I used a lot of contact spray for this and the result was fine. After cleaning i mounted the overlay and buttons. We have a new donkey kong control panel! Next, the monitor bezel mounting.

Donkey Kong - The build of the cabinet continues

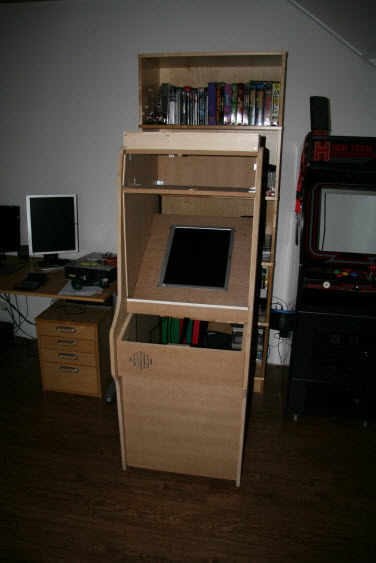
The wood was cut. Next step, mounting the donkey kong arcade cabinet. The foundation is now laid. A familiar form? I think so. Time to think about the next part.. The donkey kong control panel section, but that's for the next blog.

Donkey Kong - The build starts

My name is Ron Sommeling. I am working as a IT network specialist for a company in the Netherlands. However this blog is not about my IT skills it's about another addiction i have: Donkey Kong, a classic arcade game from the early 80's

It was 1981. The year i met the Donkey. We where close for about four years and then...., it suddenly disappeared! Someone thought it was time for another cab in my favorite dinning place. What where they thinking? The Nintendo Donkey Kong cashed more then their food!! Leaving me alone with a dark future. I searched for other Nintendo Donkey Kong's but never found one like my beloved. So my life continued empty until this day!!


To get a original donkey kong arcade cabinet in the Netherlands is very difficult. Another option, buy one on ebay, ship it over to the Netherlands and restore it to the original state. A option but way to expensive! Inspired by the movie "The King of Kong a fistful of quarters" Steve Wiebe versus Billy Mitchell i decided to build from scratch. That was the plan. I searched the Internet for a building plan and found one on the Jakobud site This was a good starting point. Building the donkey kong cab with MDF wood and try as close as the original. First things first. Drawing a full size model on paper